Pull Apart Graveyard Cupcakes – Halloween Cupcake Cake for Parties
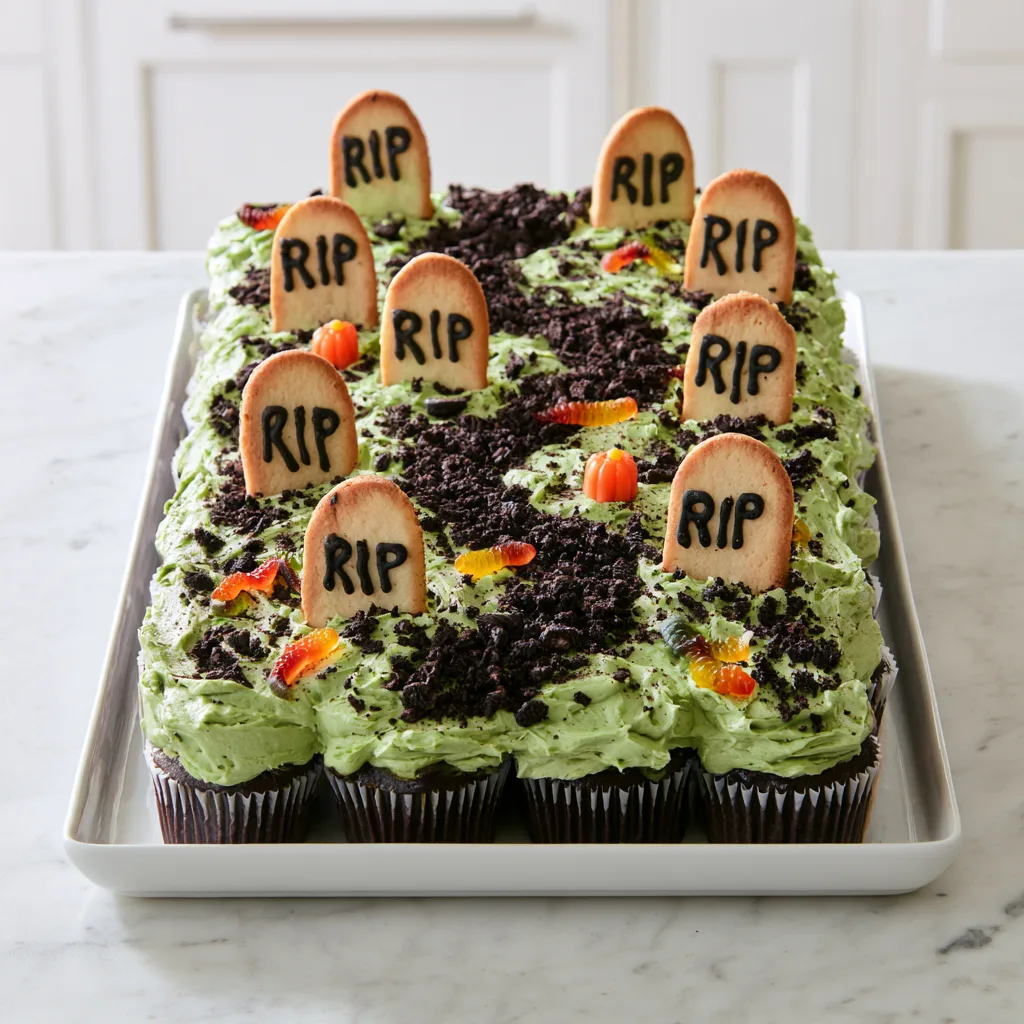
Halloween desserts are even more exciting when they double as decorations, and these Pull Apart Graveyard Cupcakes turn an ordinary batch of chocolate cupcakes into an adorable edible cemetery. With soft chocolate cake, fluffy green buttercream, cookie tombstones, and crushed chocolate-cookie dirt, this playful Halloween treat is designed to be the centerpiece of any spooky celebration.
The best part? There’s no complicated cake carving, stacking, or slicing involved. Instead, individual cupcakes are arranged closely together and decorated as one large graveyard cupcake cake. When it’s time for dessert, everyone simply pulls away their own cupcake.
Whether you’re preparing treats for a classroom Halloween party, hosting a costume celebration, or organizing a family movie night, these Halloween pull apart cupcakes are a wonderfully creative alternative to a traditional frosted cake.
The decorating process is surprisingly simple, and there’s plenty of room to customize the cemetery with candy pumpkins, gummy worms, edible bones, and your favorite Halloween decorations.
If you’re looking for a Halloween party dessert that’s fun to assemble, easy to serve, and filled with chocolate flavor, this recipe deserves a place on your October baking list.
Why You’ll Love These Pull Apart Graveyard Cupcakes
There’s something special about desserts that encourage everyone to gather around the table. These cupcakes combine the visual appeal of a decorated celebration cake with the convenience of individual servings.
No cake-cutting required. Each cupcake can be pulled away from the display, making serving much easier at crowded Halloween parties.
Perfect for decorating with kids. Younger helpers can scatter cookie crumbs, position gummy worms, and arrange candy pumpkins while adults handle the baking and more delicate frosting work.
Made with familiar ingredients. The cupcake batter uses pantry staples, and the graveyard decorations come together with ordinary cookies and candy.
Easy to prepare ahead. The chocolate cupcakes can be baked the day before, leaving the frosting and decorating for Halloween itself.
Customizable for different occasions. The graveyard can look cute and colorful for children or slightly more mysterious with darker frosting and fewer bright decorations.
Great for sharing. A single batch makes 24 cupcakes, enough for a family gathering, school event, or small Halloween celebration.
Unlike a traditional layer cake, this pull-apart design also makes portioning straightforward. There’s no need to find a cake knife or worry about cutting even slices.
What Are Pull Apart Graveyard Cupcakes?
Pull-apart cupcakes are individual cupcakes arranged so closely together that frosting can be spread across their tops as one continuous surface.
The finished dessert looks like a large decorated cake, but each portion remains separate underneath the frosting.
For this Halloween version, 24 chocolate cupcakes are arranged in a rectangular 4-by-6 layout. A generous layer of green vanilla buttercream transforms their tops into a grassy cemetery.
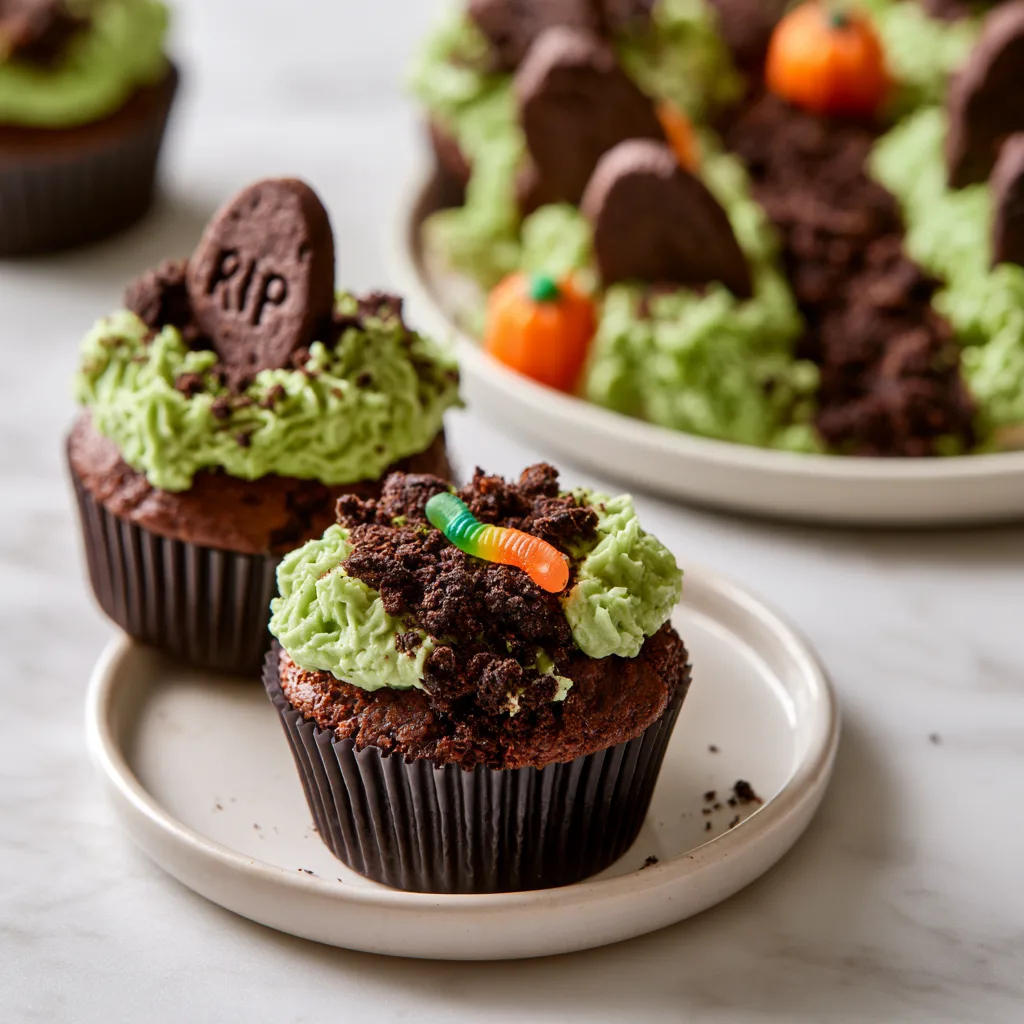
Crushed chocolate sandwich cookies create the appearance of freshly disturbed soil, while upright oval cookies become miniature gravestones.
A few strategically placed gummy worms and candy pumpkins complete the scene.
This style of dessert is sometimes called a cupcake cake, and it’s particularly convenient for celebrations where guests want to serve themselves.
The key is arranging the cupcakes closely enough that the frosting can connect them without falling into large gaps.
Recipe Overview
- Prep Time: 55 minutes
- Cook Time: 20 minutes
- Cooling Time: 45 minutes
- Total Time: 120 minutes
- Servings: 24 cupcakes
- Difficulty: Easy
- Course: Dessert, Snack
- Cuisine: American-inspired Halloween baking
The complete recipe includes homemade chocolate cupcakes, green vanilla buttercream, and edible cemetery decorations.
Ingredients for Pull Apart Graveyard Cupcakes
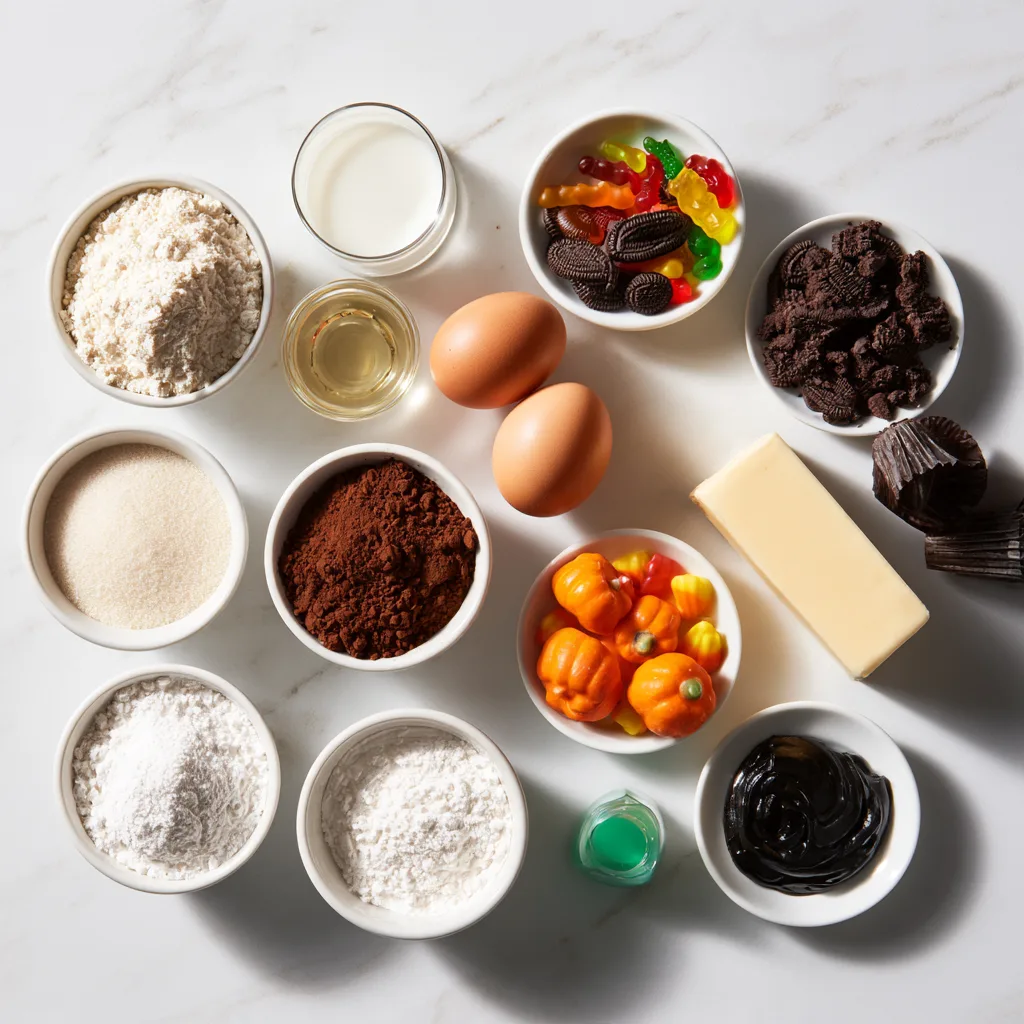
This recipe is divided into three simple components: chocolate cupcakes, vanilla buttercream, and Halloween decorations.
For the Chocolate Cupcakes
- 1¾ cups all-purpose flour
- 1¾ cups granulated sugar
- ¾ cup unsweetened cocoa powder
- 1½ teaspoons baking powder
- 1½ teaspoons baking soda
- 1 teaspoon fine salt
- 2 large eggs
- 1 cup whole milk, room temperature
- ½ cup neutral vegetable oil
- 2 teaspoons vanilla extract
- ¾ cup hot water
For the Green Vanilla Buttercream
- 1 cup unsalted butter, softened
- 4 cups powdered sugar
- 2 teaspoons vanilla extract
- 2–3 tablespoons milk
- 1–2 drops green gel food coloring, or enough for the desired shade
For the Graveyard Decorations
- 8 oval sandwich cookies, for tombstones
- 10 chocolate sandwich cookies, crushed into dirt crumbs
- 1 tube black decorating icing
- 6 gummy worms, optional
- 8 miniature candy pumpkins, optional
Feel free to adjust the decorative candy quantities based on the size and appearance of your finished graveyard.
Understanding the Key Ingredients
Cocoa Powder
Unsweetened cocoa powder gives the cupcakes their rich chocolate flavor and dark color.
Natural unsweetened cocoa works well with the baking soda in this recipe. Avoid replacing it with sweetened hot chocolate powder, which contains additional ingredients and won’t produce the same result.
Vegetable Oil
Oil helps keep the chocolate cupcakes soft and tender, even after they’ve been refrigerated.
Choose a neutral oil such as sunflower, canola, or regular vegetable oil so it doesn’t compete with the chocolate flavor.
Hot Water
Adding hot water helps disperse the cocoa powder throughout the batter, producing a smoother mixture and emphasizing the chocolate flavor.
The finished batter will be thinner than many traditional cupcake batters. This is expected, so resist the temptation to add extra flour.
Buttercream Frosting
American-style buttercream is particularly useful for this dessert because it’s easy to spread and holds its shape.
A slightly firm buttercream is better than a runny frosting when connecting multiple cupcakes.
Chocolate Sandwich Cookies
Crushed chocolate sandwich cookies create an attractive dark crumb topping that resembles cemetery soil.
You can crush the cookies with their filling intact. For a darker, finer texture, remove some of the cream filling before crushing.
Oval Cookies
Oval sandwich cookies work especially well as tombstones because their rounded tops resemble traditional gravestones.
The cookies should be firm enough to stand upright when gently pressed into the frosting.
How to Make Pull Apart Graveyard Cupcakes
Follow these steps to bake the cupcakes, prepare the frosting, and assemble your Halloween graveyard.
Step 1: Prepare the Oven and Muffin Pans
Preheat your oven to 350°F (175°C).
Line two standard 12-cup muffin pans with 24 cupcake liners.
Dark liners work particularly well for the graveyard theme, but any color will do.
Make sure your oven is fully preheated before the cupcakes go inside. Consistent oven temperature helps the cupcakes rise evenly and bake at approximately the same rate.
Step 2: Combine the Dry Ingredients
In a large mixing bowl, whisk together the flour, granulated sugar, cocoa powder, baking powder, baking soda, and salt.
Continue whisking until the mixture has a uniform color and no obvious cocoa lumps remain.
If your cocoa powder is particularly clumpy, sift it before adding it to the bowl.
Combining the dry ingredients thoroughly helps distribute the leavening agents evenly throughout the batter.
Step 3: Mix the Wet Ingredients
In a separate bowl, whisk together the eggs, room-temperature milk, vegetable oil, and vanilla extract.
Mix until the eggs are completely incorporated.
Pour the wet mixture into the bowl containing the dry ingredients.
Stir gently until the flour disappears and the ingredients are just combined.
Avoid prolonged mixing at this stage because excessive mixing can produce a firmer cupcake texture.
Step 4: Add Hot Water
Slowly pour the hot water into the batter while stirring.
Continue mixing until the batter becomes smooth and pourable.
It may appear unusually thin compared with butter-based cake batter, but that’s completely normal for this recipe.
Divide the batter evenly among the 24 prepared cupcake liners, filling each approximately two-thirds full.
Avoid overfilling, since excessively domed cupcakes can be difficult to frost together into one flat graveyard surface.
Step 5: Bake the Chocolate Cupcakes
Place the muffin pans in the preheated oven.
Bake for approximately 18–22 minutes, checking for doneness near the beginning of that range.
The cupcakes are ready when their tops spring back gently and a toothpick inserted into the center comes out clean or with a few moist crumbs.
If your oven heats unevenly, rotate the pans during baking as needed.
Be careful not to overbake. Moist chocolate cupcakes are especially delicious beneath the sweet vanilla frosting.
Step 6: Cool Completely
Allow the cupcakes to rest in their pans for about five minutes.
Carefully transfer them to a wire rack and let them cool completely, allowing approximately 45 minutes of total cooling time.
This step is essential.
If the cupcakes are even slightly warm, the buttercream may soften and slide between them rather than forming a neat, continuous surface.
While the cupcakes cool, prepare your decorating ingredients and serving board.
Step 7: Prepare the Green Buttercream
Place the softened butter in a large mixing bowl.
Beat with a hand mixer or stand mixer until smooth and creamy.
Gradually add the powdered sugar in several batches, mixing on low speed initially to prevent a cloud of sugar from escaping the bowl.
Add the vanilla extract and two tablespoons of milk.
Increase the mixer speed and beat until the frosting becomes fluffy and smooth.
If necessary, add the remaining tablespoon of milk to achieve a spreadable consistency.
Start with one or two drops of green gel food coloring, then mix thoroughly.
For a realistic cemetery appearance, aim for a soft, slightly muted grass-green shade rather than fluorescent green.
The buttercream should spread smoothly while remaining thick enough to bridge the gaps between cupcake tops.
Step 8: Arrange the Cupcake Graveyard
Choose a large, flat, food-safe serving board or rectangular tray.
Arrange the completely cooled cupcakes in four rows of six, positioning them as closely together as possible.
Try to keep the cupcake tops at approximately the same height.
If a few cupcakes have risen much higher than the others, gently trim their domed tops with a serrated knife.
Spoon generous amounts of green buttercream across the assembled cupcakes.
Using an offset spatula, carefully smooth the frosting into one connected surface.
Work gently over the spaces between cupcakes instead of pressing the frosting downward into the gaps.
The finished surface should resemble a grassy field, with the individual cupcake shapes still subtly visible around the edges.
Step 9: Create the Cemetery Decorations
Place the oval sandwich cookies on a clean work surface.
Using black decorating icing, write short inscriptions such as “RIP” on the cookies.
Simple crosses or tiny decorative lines work well, too.
Next, crush the chocolate sandwich cookies into fine crumbs.
You can place them in a resealable bag and gently crush them with a rolling pin, or pulse them briefly in a food processor.
Sprinkle the cookie crumbs onto the green buttercream in small mounds and irregular pathways.
For a realistic graveyard effect, position some crumbs immediately in front of the areas where the cookie tombstones will stand.
Leave portions of the green frosting visible to resemble grass.
Step 10: Assemble and Serve
Carefully press each decorated cookie tombstone into the frosting, positioning the cookies upright at slightly different angles.
If a cookie needs extra support, place a small amount of buttercream behind its base.
Add gummy worms so they appear to crawl through the chocolate soil.
Position miniature candy pumpkins around the cemetery for pops of autumn color.
For a final decorative touch, use any remaining green frosting to pipe small tufts of grass around the tombstones.
Your Pull Apart Graveyard Cupcakes are now ready to serve.
Guests can simply lift an individual cupcake from the arrangement, pulling it away from the surrounding frosting without needing to slice the display.
How to Decorate the Perfect Graveyard Cupcake Cake
The decorations are what make this Halloween dessert memorable, and thoughtful placement can transform a simple batch of cupcakes into a miniature edible landscape.
Create Uneven Dirt Patches
Instead of covering the entire surface with cookie crumbs, sprinkle them in irregular shapes.
Small crumb mounds in front of tombstones look like freshly disturbed soil, while narrow trails can resemble paths through the cemetery.
Leaving open patches of green buttercream provides contrast and makes the darker decorations stand out.
Vary the Tombstone Angles
Perfectly straight rows can look a little artificial.
Position some cookies upright and others with a slight lean to create an old-fashioned cemetery appearance.
Avoid pushing them too deeply into the cupcakes because this could damage the cake beneath the frosting.
Use Candy Sparingly
A few gummy worms and pumpkins are enough to communicate the Halloween theme.
Too many decorations can hide the frosting and make the graveyard look crowded.
For a more elegant dessert, focus on the green, brown, and black color palette, adding only a few orange accents.
Add Frosting Grass
If you have a piping bag fitted with a small star or grass tip, pipe short clusters of green buttercream around the tombstones.
These small details add texture without requiring advanced decorating skills.
A resealable plastic bag with a tiny corner snipped off can also work for simple decorative accents.
Tips for the Best Halloween Pull Apart Cupcakes
Keep the cupcakes close together. Large spaces between the cupcakes make it difficult to create a smooth frosting surface. A tight arrangement provides better support.
Cool before decorating. Even slightly warm chocolate cupcakes can cause the buttercream to melt, making assembly messy.
Use gel coloring. Gel food coloring provides a concentrated shade without adding much liquid to the frosting.
Start with less milk. Buttercream can always be thinned, but overly soft frosting may not hold the tombstones upright.
Prepare the tombstones separately. Writing on the cookies before placing them into the graveyard is much easier than trying to decorate them once they’re standing.
Use a sturdy serving board. A large food-safe cake board or flat serving tray makes transporting the finished cupcake display safer.
Decorate near serving time. Cookie tombstones gradually soften when they absorb moisture from buttercream, so they look and taste best when added shortly before serving.
Fun Variations to Try
Cookies and Cream Graveyard Cupcakes
Fold a few tablespoons of finely crushed chocolate sandwich cookies into part of the buttercream.
This adds extra cookie flavor and creates a speckled frosting effect.
Keep most of the frosting smooth and green so the graveyard design remains visible.
Dark Chocolate Cemetery
Replace a small portion of the green buttercream with chocolate frosting to create dark pathways between the graves.
The deeper colors produce a slightly spookier appearance, especially when paired with chocolate cookie tombstones.
Pumpkin Patch Graveyard
Add extra miniature candy pumpkins and create small pumpkin patches in the corners of the display.
This version works beautifully for autumn parties that combine Halloween decorations with traditional harvest themes.
Mini Monster Graveyard
Replace several tombstones with candy eyeballs and small monster faces made from frosting.
This variation is particularly fun for younger children who prefer cute Halloween decorations over scary ones.
Vanilla Cupcake Version
If chocolate isn’t your favorite, use your preferred vanilla cupcake recipe as the base.
Keep the same 24-cupcake arrangement, frosting technique, and cemetery decorations.
The finished dessert will have a lighter interior while maintaining the same spooky exterior.
Can You Make Pull Apart Graveyard Cupcakes Ahead of Time?
Absolutely. Preparing parts of the recipe in advance can make Halloween entertaining much easier.
One Day Before Serving
Bake the chocolate cupcakes and allow them to cool completely.
Store them in an airtight container at cool room temperature.
Prepare the buttercream separately and refrigerate it in a sealed container.
Before decorating, allow refrigerated buttercream to soften slightly and beat it briefly until smooth again.
On the Day of Serving
Arrange the cupcakes on your serving board and spread the green frosting across their tops.
Crush the chocolate cookies and decorate the tombstones.
Finish the graveyard with the cookie crumbs, tombstones, gummy worms, and candy pumpkins.
Adding the cookies near serving time helps preserve their crisp texture.
How to Store Leftovers
Cover any leftover cupcakes and refrigerate them for up to three days.
For the best eating texture, allow refrigerated cupcakes to sit at room temperature for approximately 15–20 minutes before serving.
The frosting will soften slightly, and the chocolate cake will taste more tender.
Keep in mind that cookies and candy may absorb moisture during storage.
Can You Freeze Them?
The undecorated chocolate cupcakes freeze well.
Wrap the completely cooled cupcakes individually or place them in a suitable airtight freezer container.
Freeze for up to two months for the best quality.
Thaw them while covered, then assemble and decorate once they have reached room temperature.
Freezing the fully decorated graveyard is not recommended because the candy and cookie decorations may become soggy or lose their shape during thawing.
Serving Suggestions for Halloween Parties
A finished graveyard cupcake cake makes a wonderful centerpiece for a Halloween dessert table.
Place it on a dark serving tray or a simple white rectangular platter to highlight the contrast between the green frosting and chocolate-cookie soil.
For a larger Halloween dessert spread, pair the cupcakes with caramel apples, chocolate-dipped pretzels, popcorn, or fresh fruit.
A small handwritten Halloween sign beside the display can help guests understand that the cake is designed to pull apart.
For classroom parties, consider removing decorations that may pose a choking risk for younger children and use age-appropriate toppings.
Because each cupcake already has its own paper liner, serving is convenient and requires very little additional preparation.
If you need to transport the dessert, assemble it on the same board you plan to use for serving. Place the board inside a sturdy cake carrier or tall box so the upright tombstones aren’t damaged.
Frequently Asked Questions
How many cupcakes do I need for a pull-apart graveyard cake?
This recipe uses 24 standard-size cupcakes arranged in four rows of six. The rectangular formation creates enough surface area for a recognizable cemetery scene while still offering convenient individual servings.
For a smaller gathering, you can halve the cupcake recipe and create a 3-by-4 arrangement using 12 cupcakes. Reduce the frosting and decorations accordingly.
Can I use boxed cake mix instead?
Yes. A standard chocolate cake mix prepared according to its package instructions can work well for this dessert.
Choose a mix that yields approximately 24 standard cupcakes, and follow the package’s recommended baking time and temperature.
You can still prepare the homemade green buttercream and use the same graveyard decorating technique.
How do I keep the tombstone cookies from falling over?
Use thick buttercream and insert the cookies gently into the tops of the cupcakes rather than relying on the frosting alone.
A small extra dab of buttercream behind each cookie can help support it.
Avoid choosing cookies that are exceptionally large or heavy, as they may be difficult to keep upright.
Can children help make these Halloween cupcakes?
Yes! This dessert is an excellent family baking activity.
Adults can handle the oven, hot pans, and electric mixer, while children help with decorating once everything has cooled.
Crushing chocolate cookies, arranging pumpkins, and positioning gummy worms are especially enjoyable tasks for younger helpers.
What is the easiest way to pull apart the cupcakes?
Gently hold the paper liner of one cupcake and lift it away from the arrangement.
The buttercream connecting the cupcake tops should separate naturally.
Some frosting may stretch slightly between neighboring cupcakes, but this is part of the fun of a pull-apart cake.
Do I need special cake-decorating equipment?
No special equipment is required.
A standard muffin pan, mixing bowls, electric mixer, serving tray, and spatula are sufficient.
A piping bag can add decorative grass details, but it’s completely optional.
What other cookies can I use for gravestones?
Firm oval tea biscuits, shortbread cookies, or small rectangular sandwich cookies can all work.
The most important qualities are a flat surface for writing and enough structure to stand upright in the frosting.
Choose cookies with shapes and flavors that complement chocolate cupcakes.
Can I prepare the entire graveyard the night before?
You can frost and arrange the cupcakes the evening before serving.
However, it is better to add cookie tombstones and chocolate-cookie crumbs closer to serving time.
This prevents the cookies from absorbing too much moisture and helps preserve the finished dessert’s appearance.
Final Thoughts
These Pull Apart Graveyard Cupcakes bring together everything that makes Halloween baking enjoyable: chocolate cake, creative decorations, and a dessert that’s designed to share.
The soft chocolate cupcakes provide a delicious foundation, while the green buttercream, cookie tombstones, and edible chocolate dirt turn the finished display into a miniature cemetery.
Whether you’re preparing a Halloween party dessert for children, planning treats for a school celebration, or simply looking for a fun seasonal baking project, this graveyard cupcake cake is a creative way to make ordinary cupcakes feel extraordinary.
With simple ingredients, approachable decorating techniques, and plenty of opportunities for personalization, these chocolate Halloween cupcakes are sure to become a favorite addition to your autumn baking traditions.
Pull Apart Graveyard Cupcakes
Ingredients
Equipment
Method
- Preheat the oven to 350°F (175°C). Line two 12-cup muffin pans with 24 cupcake liners.
- In a large bowl, whisk together flour, sugar, cocoa powder, baking powder, baking soda, and salt until evenly combined.
- In a second bowl, whisk eggs, milk, oil, and vanilla. Pour the wet ingredients into the dry ingredients and stir just until combined.
- Gradually stir in hot water until the batter is smooth and thin. Divide among the 24 liners, filling each about two-thirds full.
- Bake for 18–22 minutes, rotating pans if necessary, until a toothpick inserted into the center of a cupcake comes out clean or with a few moist crumbs.
- Cool the cupcakes in the pans for 5 minutes, then transfer to a wire rack to cool completely, approximately 45 minutes total.
- Beat softened butter until smooth. Add powdered sugar in batches, then vanilla and 2 tablespoons milk. Beat until fluffy, adding remaining milk only if needed. Tint with green gel food coloring.
- Arrange the cooled cupcakes close together in a 4-by-6 rectangle on a large food-safe serving board or tray. Spread green buttercream across the tops to create one connected grassy surface, gently bridging gaps between cupcakes.
- Write RIP or simple crosses on 8 oval cookies using black decorating icing. Crush 10 chocolate sandwich cookies into fine crumbs, then sprinkle them in little mounds and paths over the frosting.
- Press the decorated cookie tombstones gently into the frosted cupcake tops. Add gummy worms and candy pumpkins if using. Serve by letting guests pull away individual cupcakes from the display.