Baked Halloween Tortilla Chips – Easy Spooky Party Snack
Halloween treats don’t always have to involve chocolate, candy, or complicated baking projects. Sometimes the most memorable party snacks are the simplest ones, especially when they come in the shape of tiny ghosts, bats, and pumpkins.
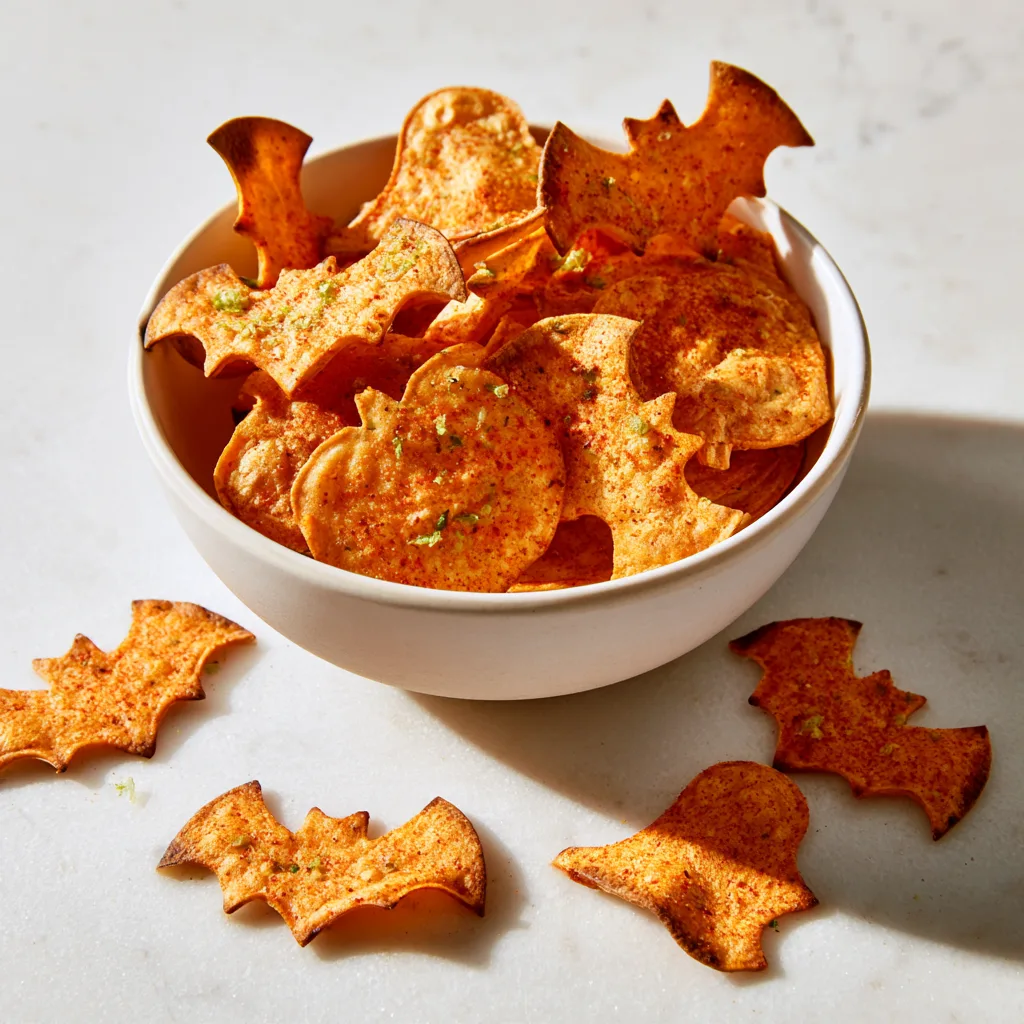
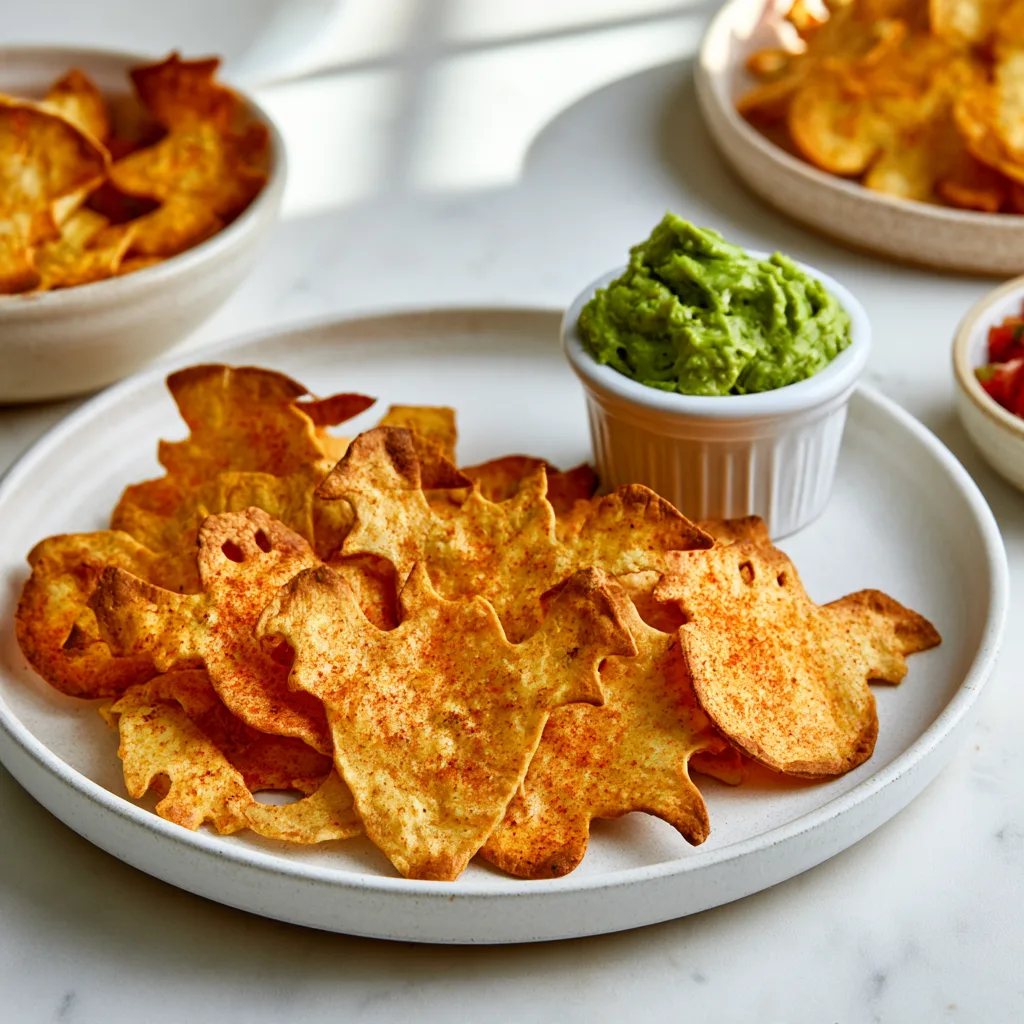
These Baked Halloween Tortilla Chips turn ordinary flour tortillas into crispy, golden, Halloween-shaped snacks with a smoky garlic seasoning and a little fresh lime zest. They’re crunchy enough for dipping, fun enough for a Halloween party, and easy to prepare using just a handful of everyday ingredients.
One of my favorite things about this idea is how much you can customize it. A few Halloween cookie cutters transform basic tortillas into something festive, while the seasoning gives them a flavor that works beautifully with guacamole, salsa, or a warm cheese dip.
They’re also a wonderful kitchen activity for families. Children can help choose the shapes, arrange the chips, and add seasonings, while adults handle the sharper tools and hot oven.
Whether you’re planning a classroom Halloween celebration, putting together a spooky snack board, or looking for something savory to balance all those Halloween sweets, these homemade chips are an easy addition to the menu.
And the best part? They’re ready in under 40 minutes, including cooling time.
Why You’ll Love These Baked Halloween Tortilla Chips
There’s something special about taking an ordinary ingredient and turning it into a snack that feels festive without requiring much extra effort.
Here are a few reasons these Halloween tortilla chips deserve a spot on your October menu.
They’re baked instead of deep-fried.
You only need a thin coating of olive oil to achieve crispy edges and a satisfying crunch. There’s no need to heat a pot of frying oil or deal with splattering.
They’re perfect for little helpers.
Cookie cutters make the preparation feel more like a Halloween craft project than cooking. Younger children can help arrange shapes and sprinkle seasonings under adult supervision.
The ingredients are easy to find.
Most grocery stores carry everything needed, and you may already have the seasonings in your kitchen.
They work with almost any dip.
From creamy guacamole to fresh tomato salsa, these chips are sturdy enough for scooping while still being light and crisp.
They’re easy to customize.
Different tortilla colors, cookie cutter shapes, and seasoning combinations let you create a completely different look or flavor without changing the basic method.
Most importantly, they’re a practical Halloween party snack that can be prepared without spending hours in the kitchen.
What Makes Homemade Halloween Chips So Crispy?
The secret to crispy baked tortilla chips is surprisingly simple: thin tortillas, a little oil, enough room on the baking sheet, and the right baking time.
As tortillas bake, moisture evaporates from their surface. The edges become firmer, and the lightly oiled exterior develops a delicate golden color.
Using too much oil can make the chips feel heavy, while overcrowding the baking sheet can cause uneven browning.
The thickness of your tortillas matters, too. Thin flour tortillas generally produce a more delicate, cracker-like crunch, while thicker tortillas may remain slightly chewy in the center.
Another important detail is cooling.
Freshly baked chips sometimes feel a little flexible when they first leave the oven. As they cool and release residual steam, they often become noticeably crispier.
That’s why it’s worth giving your spooky tortilla chips a few minutes to cool before deciding whether they’re finished.
Ingredients for Baked Halloween Tortilla Chips
This recipe uses a simple smoky garlic seasoning with a hint of lime. The combination adds flavor without overpowering whatever dip you serve alongside the chips.
For the Tortilla Chips
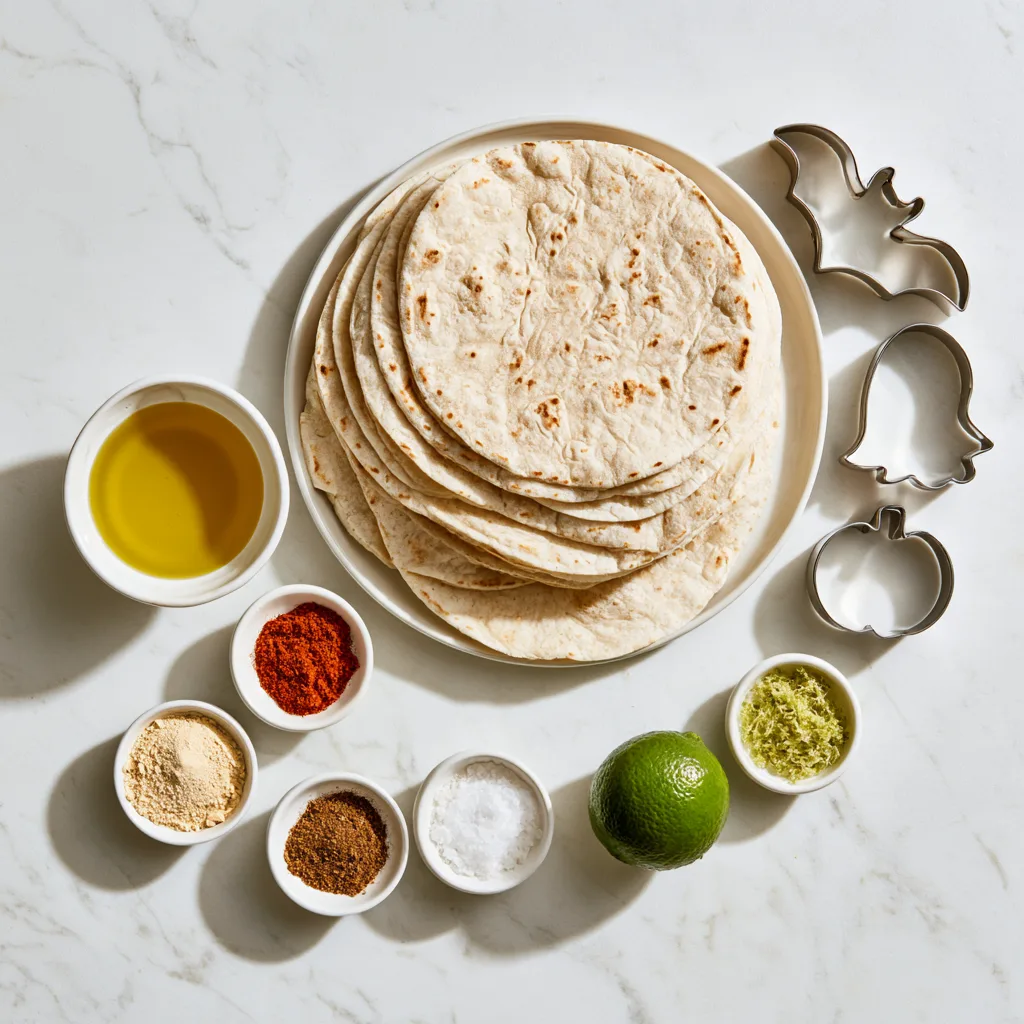
- 8 medium flour tortillas (approximately 8 inches each)
- 2 tablespoons olive oil
For the Smoky Lime Seasoning
- 3/4 teaspoon smoked paprika
- 1/2 teaspoon garlic powder
- 1/4 teaspoon ground cumin
- 1/2 teaspoon fine sea salt, or to taste
- 1 teaspoon finely grated fresh lime zest
Equipment You’ll Need
- Halloween-shaped cookie cutters (bats, ghosts, pumpkins, or witches’ hats)
- 2 large baking sheets
- Parchment paper
- Pastry brush
- Small mixing bowl
- Measuring spoons
- Thin spatula
- Wire cooling rack
Choosing the Best Tortillas
Regular flour tortillas are my first choice because they’re flexible and easy to cut into detailed shapes.
Look for tortillas that are relatively thin and soft. Very thick wraps may need additional baking time and can produce chips with chewy centers.
Corn tortillas are another option, especially if you prefer their more traditional tortilla chip flavor. However, they can crack around narrow bat wings or delicate ghost shapes, particularly when they’re dry.
If you’re using corn tortillas, choose simple cutters with rounded edges and warm the tortillas briefly until flexible before cutting.
Spinach or tomato-flavored tortillas can also introduce natural-looking green or orange tones, which are especially fun for a Halloween snack platter.
How to Make Baked Halloween Tortilla Chips
These homemade Halloween chips are straightforward to prepare, but a few small details make a difference in their appearance and texture.
Prep Time: 20 minutes
Cook Time: 12 minutes
Cooling Time: 5 minutes
Total Time: 37 minutes
Servings: 6
Step 1: Preheat the Oven
Preheat your oven to 375°F (190°C).
Line two large baking sheets with parchment paper.
Position your oven racks near the upper and lower thirds so both baking sheets have enough room for air to circulate.
Step 2: Prepare the Seasoning
In a small bowl, combine the smoked paprika, garlic powder, ground cumin, and fine sea salt.
Stir until the spices are evenly mixed.
Keep the fresh lime zest separate for now. Adding it after baking helps preserve its bright flavor without introducing unnecessary moisture during cooking.
Step 3: Cut Out the Halloween Shapes
Place one flour tortilla flat on a clean cutting board.
Press Halloween cookie cutters firmly into the tortilla to create bats, ghosts, pumpkins, and other spooky shapes.
Cookie cutters approximately 2–3 inches wide work especially well for chips intended for dipping.
Try to position the cutters close together to minimize leftover tortilla scraps.
Repeat with the remaining tortillas.
Don’t throw away the scraps! You can cut them into smaller pieces and bake them separately for everyday snacking.
Step 4: Arrange and Oil the Chips
Place the tortilla shapes on the prepared baking sheets in a single layer.
Leave a small amount of space between each chip.
Using a pastry brush, lightly coat both sides of the tortilla shapes with olive oil, dividing the two tablespoons across the full batch.
The chips should have a thin, even coating rather than look soaked in oil.
Step 5: Add the Smoky Seasoning
Sprinkle the seasoning mixture evenly over the tortilla shapes.
For balanced flavor, use approximately half the mixture on one side, gently turn the chips, and distribute the remaining seasoning on the other side.
Avoid piling the seasoning onto the narrow edges of bat-shaped chips, as those sections can brown faster.
Step 6: Bake Until Golden and Crispy
Transfer the baking sheets to the preheated oven.
Bake for approximately 8–12 minutes, gently flipping the chips around the halfway point.
If baking both sheets together, switch their rack positions halfway through for more even browning.
Begin checking the chips after 8 minutes.
Small shapes and thin pieces may finish earlier, while larger pumpkins and thicker tortillas may need the full baking time.
The chips are ready when their edges are lightly golden and their centers feel mostly firm.
Remove any pieces that finish early rather than letting them overbrown.
Step 7: Cool the Chips
Transfer the chips to a wire rack and allow them to cool for about 5 minutes.
This cooling period gives remaining steam a chance to escape and helps the chips develop their final texture.
If a chip still seems soft after cooling, return it to the oven briefly and check again.
Step 8: Finish with Lime Zest
Sprinkle the cooled or slightly warm chips with the finely grated lime zest.
Use a light touch to distribute the zest without making any individual chip damp.
Arrange the finished Halloween tortilla chips on a serving plate or in a small bowl.
Serve with your favorite dip.
Tips for Perfectly Crispy Halloween Tortilla Chips
Even though this recipe is simple, a few helpful techniques can make your chips more consistent.
Use Similar-Sized Cookie Cutters
Combining very small bats with oversized pumpkins can cause uneven baking.
Smaller shapes finish faster because they have more exposed edges relative to their size.
For the most consistent results, group shapes of similar sizes on the same baking sheet.
Don’t Overload the Baking Sheet
Overlapping tortilla pieces can prevent moisture from escaping evenly.
Give every shape its own space so the edges brown properly.
It’s better to use an additional baking sheet than crowd everything into one.
Brush, Don’t Pour, the Oil
A pastry brush gives you better control over the oil.
The objective is a thin coating that promotes browning and helps the seasoning stick.
Excess oil can produce greasy patches and make the chips less pleasant to eat.
Watch the Bat Wings
Bat-shaped cookie cutters create thin, pointed sections that often cook faster than the rest of the chip.
Check those delicate edges frequently during the final minutes.
If the wings are becoming dark while the centers are still soft, remove that batch and allow the chips to cool before judging the texture.
Season While the Oil Is Fresh
Seasoning sticks more reliably when sprinkled over freshly brushed tortillas.
If you wait too long, the oil may absorb into the tortilla, leaving some of the spices loose on the baking sheet.
Let the Chips Cool Before Serving
It’s tempting to serve the chips immediately, especially when they’re beautifully golden.
However, cooling helps stabilize their texture.
For a Halloween party, preparing them slightly ahead of serving time often works better than carrying a hot baking sheet directly to the table.
Fun Variations for Halloween Tortilla Chips
The smoky garlic version is delicious on its own, but there are plenty of ways to change the flavor while keeping the same basic technique.
1. Cinnamon Sugar Halloween Chips
For a sweeter Halloween treat, replace the savory seasoning with a mixture of cinnamon and granulated sugar.
Brush the tortilla shapes lightly with melted butter or a neutral oil, sprinkle with cinnamon sugar, and bake until crisp.
These are particularly tasty alongside a thick pumpkin dip, sweetened cream cheese, or apple butter.
Keep sweet and savory batches on separate baking sheets to avoid mixing flavors.
2. Cheesy Garlic Tortilla Chips
For a savory variation, sprinkle the oiled tortillas with garlic powder and a small amount of finely grated Parmesan cheese.
The cheese develops a lightly toasted flavor as it bakes.
Keep the cheese layer thin to prevent clumping and check the chips frequently because cheese can brown quickly.
3. Spicy Halloween Tortilla Chips
If you’re preparing snacks for adults who enjoy heat, add a pinch of cayenne pepper or crushed chili flakes to the seasoning mixture.
A little chili powder also works well.
Serve the spicy version with cool sour cream or creamy avocado dip for contrast.
4. Colorful Monster Chips
For a more dramatic Halloween presentation, use a combination of plain, spinach, and tomato-flavored tortillas.
Green tortilla bats, orange pumpkins, and pale ghost shapes create a playful mix of colors without relying on decorative food coloring.
Keep in mind that flavored tortillas may have different moisture levels and baking times.
5. Simple Salted Tortilla Chips
Sometimes the simplest variation is the most useful.
Skip the paprika, cumin, garlic, and lime zest, and season the tortillas with olive oil and a little salt.
This version is ideal when you’re serving strongly flavored dips and want the chips to provide crunch without competing with the other ingredients.
What to Serve with Baked Halloween Tortilla Chips
These crispy Halloween party snacks are especially good with dips because their unusual shapes make even a simple bowl of salsa feel festive.
Guacamole
The creamy texture and fresh flavor of guacamole contrast beautifully with the crisp tortilla chips.
The bright green color also creates a natural Halloween-inspired presentation.
For younger children, use a mild guacamole without hot peppers.
Fresh Tomato Salsa
A bright red tomato salsa adds acidity and freshness to the plate.
Choose a thicker salsa rather than a watery one so the chips don’t soften too quickly when dipped.
Warm Queso
Melted cheese dip turns these chips into a more substantial party appetizer.
Serve the queso in a small bowl with the tortilla chips arranged around it.
Black Bean Dip
Creamy black bean dip is another excellent pairing, particularly when seasoned with garlic, cumin, and a little lime.
It also provides a more filling option if the chips are part of a larger snack spread.
Pumpkin Hummus
For an autumn-inspired pairing, serve the chips with a savory pumpkin hummus.
Pumpkin puree, chickpeas, tahini, and warm spices create a dip that feels seasonal without being overly sweet.
How to Create a Halloween Snack Board
A Halloween snack board doesn’t have to be complicated to look impressive.
Start with a large wooden board or white serving platter.
Place a small bowl of guacamole near the center, followed by another bowl containing salsa or cheese dip.
Arrange the baked Halloween tortilla chips around the bowls, keeping the bat, ghost, and pumpkin shapes visible.
Instead of piling everything into one large mound, create a few smaller clusters.
You can fill the remaining spaces with:
- Orange bell pepper strips
- Baby carrots
- Cucumber slices
- Cherry tomatoes
- Small cheese cubes
- Black olives
- Mini pretzels
For a more dramatic presentation, place the green guacamole next to the orange pumpkin-shaped chips.
The contrast makes the snack board feel festive without requiring artificial decorations.
This kind of platter works particularly well for family movie nights, Halloween parties, or an after-school celebration.
Can You Make Halloween Tortilla Chips Ahead of Time?
Yes! These chips are a convenient make-ahead snack, provided they’re cooled and stored correctly.
For the best texture, prepare them on the day you plan to serve them.
If you’re organizing a larger Halloween party, you can also bake them the day before.
Allow the chips to cool completely before transferring them to an airtight container.
Any remaining warmth can create condensation inside the container, introducing moisture and softening the chips.
Store them at room temperature in a cool, dry place for up to 2 days for the best quality.
Avoid refrigerating them because refrigerator moisture can affect their crispness.
If the chips lose some crunch, spread them on a baking sheet and warm them in a 325°F (165°C) oven for approximately 3–5 minutes.
Let them cool again before serving.
For party planning, another option is to cut the tortilla shapes in advance, keep them well covered to prevent drying, and bake them closer to serving time.
Whichever approach you choose, store the chips separately from any dips until everyone is ready to eat.
Common Mistakes to Avoid
Using Tortillas That Are Too Thick
Very thick tortillas may brown around the edges before their centers become crisp.
Choose thin tortillas whenever possible.
If you’re using thicker wraps, expect the baking time to vary and watch the edges carefully.
Adding Too Much Oil
More oil doesn’t automatically create crispier chips.
A heavy coating can leave greasy spots and slow down the drying process.
Use just enough oil to coat both sides lightly.
Baking Every Shape for Exactly the Same Time
Ghosts, bats, and pumpkins often have different dimensions.
A narrow bat wing can become dark while the middle of a larger pumpkin is still slightly flexible.
Check each shape rather than relying entirely on the timer.
Adding Wet Toppings Before Storage
Fresh salsa, lime juice, and other wet ingredients can soften the chips.
Keep dips on the side and use dry seasoning or finely grated zest for the best make-ahead texture.
Packing the Chips While They’re Warm
Even perfectly baked chips can lose their crunch when sealed before cooling.
Allow them to reach room temperature before storing.
Frequently Asked Questions
Can I Make Baked Halloween Tortilla Chips with Corn Tortillas?
Absolutely. Corn tortillas can produce delicious chips with a pronounced corn flavor.
However, they tend to be less flexible than flour tortillas, which makes intricate Halloween shapes more difficult to cut.
Choose wider cookie cutters with fewer narrow sections, and warm the tortillas briefly if they feel stiff.
Depending on their thickness, corn tortillas may require a slightly different baking time.
Are Baked Halloween Tortilla Chips Healthier Than Fried Chips?
Baking allows you to control how much oil is added, which can make these chips lower in added fat than a heavily deep-fried version.
However, the overall nutritional value depends on the tortillas, portion size, and seasonings you use.
Both baked and fried tortilla chips can fit into a balanced eating pattern.
If you’re comparing products, check the tortilla packaging and oil quantities rather than assuming all baked chips have the same nutritional profile.
Can I Make These Halloween Chips Gluten-Free?
Yes, provided you use certified gluten-free tortillas and check that your seasonings are suitable.
Corn tortillas are a common option, but not every tortilla product is guaranteed gluten-free.
If you’re preparing food for someone with celiac disease, also avoid cross-contact with gluten-containing ingredients and equipment.
How Do I Keep the Halloween Shapes from Breaking?
Start with soft, flexible tortillas.
Press the cookie cutters down firmly and lift the shapes gently.
Use a thin spatula when transferring delicate pieces, especially bats with narrow wings.
Simple shapes such as pumpkins and rounded ghosts are generally easier to work with than intricate designs.
Can I Cook Halloween Tortilla Chips in an Air Fryer?
Yes, although you’ll usually need to work in smaller batches.
Try cooking at approximately 350°F (175°C) for 4–7 minutes, checking frequently.
Air fryers vary considerably, and their circulating air can move lightweight tortilla pieces around the basket.
Use an appropriate rack or accessory if needed, avoid overcrowding, and follow your appliance’s instructions.
Why Are My Baked Tortilla Chips Chewy?
Chewy chips usually need more moisture removed during baking.
This may happen when the tortillas are especially thick, the baking sheet is crowded, or the cooking time is too short.
Allow the chips to cool first, since they may become crispier.
If they’re still flexible, return them to the oven for another minute or two and check frequently.
Can I Make These Chips Without Halloween Cookie Cutters?
Definitely.
Use a small, sharp knife to cut simple shapes, or cut the tortillas into traditional triangles.
You can also create basic ghosts or pumpkins by drawing a paper template and carefully cutting around it.
For children helping in the kitchen, adult supervision is important whenever sharp tools are involved.
How Far in Advance Can I Prepare the Chips for a Halloween Party?
For the freshest flavor and texture, baking them earlier on the day of your party is ideal.
Preparing them one day ahead also works well when they’re properly cooled and stored in an airtight container.
If you’re serving several different dips, prepare those separately and assemble the snack platter shortly before guests arrive.
A Fun Halloween Snack Without the Fuss
The best Halloween recipes are often the ones that bring a little creativity into everyday cooking.
These Baked Halloween Tortilla Chips are proof that a few tortillas, some simple seasonings, and a set of cookie cutters can create a snack that’s just as fun to prepare as it is to share.
They add a festive touch to party platters, work wonderfully with homemade dips, and give everyone something savory to enjoy between the seasonal sweets.
Whether you choose bats, pumpkins, ghosts, or a mixture of all three, the combination of crispy edges, smoky seasoning, and fresh lime makes these chips a delicious addition to your Halloween menu.
From my kitchen to yours, happy Halloween!
Baked Halloween Tortilla Chips
Ingredients
Equipment
Method
- Preheat the oven to 375°F (190°C). Line two large baking sheets with parchment paper and position the oven racks in the upper and lower thirds.
- Combine smoked paprika, garlic powder, ground cumin, and fine sea salt in a small bowl. Mix thoroughly and set aside. Keep the fresh lime zest separate until after baking.
- Place flour tortillas on a clean cutting board. Use Halloween-shaped cookie cutters, approximately 2–3 inches wide, to cut out bats, ghosts, pumpkins, or other shapes. Repeat with the remaining tortillas. Save leftover scraps for baking separately.
- Arrange the tortilla shapes in a single layer on the prepared baking sheets, leaving a little space between each piece. Lightly brush both sides with olive oil, distributing the oil evenly across the batch.
- Sprinkle approximately half of the smoky seasoning over one side of the tortilla shapes. Turn them gently and distribute the remaining seasoning over the other side.
- Bake for approximately 8–12 minutes, gently flipping the chips halfway through. Switch the baking sheets between racks for even cooking. Begin checking after 8 minutes and remove smaller pieces early if necessary. The chips should have lightly golden edges and mostly firm centers.
- Transfer the baked tortilla chips to a wire cooling rack. Allow them to cool for approximately 5 minutes to develop their final crisp texture.
- Sprinkle lightly with finely grated fresh lime zest. Arrange on a serving platter and serve with guacamole, salsa, queso, or another favorite dip.